Saturday, March 16, 2019

Flag Relay Game

{Affiliate links used.}

This summer will be the third year I have done Spanish camps. I am so looking forward to it! My more advanced students will be working with a bit more geography and with the flags of Spanish-speaking countries. I was trying to come up with ideas on to get them more familiar with the flags. We will paint some of the flags on rocks (see the end of this post for more information). We will also be making the flags out of Legos (See Mundo de Pepita's post about this activity HERE.) But I also wanted a game we could do that would get them moving.

So I decided to make a relay game out of the flags...


I picked out ten of the 21 flags. I limit my camps to ten kids at a time so with this game they can either work by themselves or in pairs. Basically, they will line up at the start line, and I will give each student or pair a country. Out in the field in front of them will be all the flag pieces. They will have to race to collect the correct pieces of their flag and put it together at the start line. Because my students are not going to know the flags at the beginning I will be providing them a paper with all the flags on them for reference.

I started by cutting the appropriate color cardstock into pieces to make the ten flags I chose (see above). I then when and printed off any coats of arms or stars that were needed. All of the pieces are laminated for durability. While the game won't be completely fair (some flags will have a few more pieces than others), I think it will be a fun way to work with them.

See below for a few more activities related to flags!


Other ideas for flags?


Collect some rocks and get painting! We will be using acrylic paint (like this set) to paint several of the flags. You can seal the paint afterward with this sealer.


I bought a lot of sidewalk chalk (Here's a big pack of it.) in order for my students to draw flags. They really enjoyed this activity!

Any other ideas for flags? I would love to hear them!


Monday, March 11, 2019

Spanish Camp - Discoverers

Join me in June for four days to learn some Spanish through cultural crafts, games, stories, and fun! This camp is for kids who have had a year or less exposure to the language and who have NOT done a previous camp or ¡Explora Español! class with me. Each day will be spent learning some basics of Spanish through games and stories and focusing on one of the Spanish-speaking countries through a craft.

Below are three of the four crafts we will be doing...


{La Boca Neighborhood, Buenos Aires, Argentina}

{Molas from Panama}

{Personal Piñatas}

The Details...

K-3rd Graders     June 3-6 (Monday-Thursday)  2-4pm
4th-8th Graders   June 10-13  (Monday-Thursday)  2-4pm

The cost is $80 (non-refundable) and must be paid in advance to secure your child(ren)'s spot.

Contact Debbie through her Facebook page at Debbie's Spanish Learning for more information and sign-up instructions.

______________________________________________________________________________

Debbie has been teaching Spanish for over 25 years. She has a passion for teaching kids the language and sharing with them the cultures and places where it is spoken. It is her hope through teaching the language to instill a love in her students for exploring the world around them.

Spanish Camp - Explorers


Join me in June for four days to further extend your child(ren)'s knowledge of  Spanish through cultural crafts, games, stories, and fun! This camp is for kids who have some exposure to the language or who have done a previous camp or ¡Explora Español! class with me. This year we will explore the countries of Costa Rica, Peru, and Guatemala plus explore the geography and flags of all the Spanish-speaking countries.

Below are two of the four crafts we will be doing...


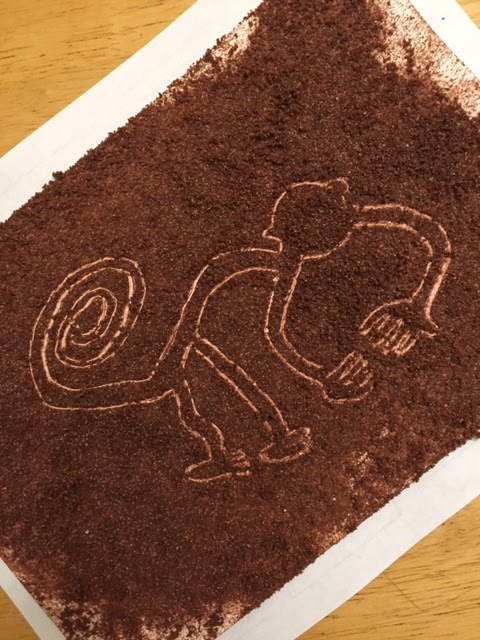
{The Nazca Lines of Peru}

{The Quetzal bird of Guatemala}


The Details...

K-3rd Graders    June 24-27 (Monday-Thursday)  2-4pm
4th-8th Graders  June 17-20 (Monday-Thursday)  2-4pm

The cost is $80 (non-refundable) and must be paid in advance to secure your child(ren)'s spot.


Contact Debbie through her Facebook page at Debbie's Spanish Learning for more information and sign-up instructions.


______________________________________________________________________________

Debbie has been teaching Spanish for over 25 years. She has a passion for teaching kids the language and sharing with them the cultures and places where it is spoken. It is her hope through teaching the language to instill a love in her students for exploring the world around them.

Saturday, February 2, 2019

A Simple Weather Craft for Language Learners


I have been teaching a six-session class called ¡Explora Español! this year. It combines language learning with simple crafts. Thus far, I had not found an easy idea to do with weather that I really like until I came across this photo.

{Affiliate Links Used.}

My goal is to first teach the vocabulary and then do the craft completely in the target language by giving step-by-step instructions.

Here are the items you need:


Have fun creating and using the language!


Wednesday, October 3, 2018

Culture, Crafts, and Language Learning


{Affiliate Links Used}

It's been SEVERAL months since I posted. Life has been much busier than I ever imagined. This past summer I did Spanish camps and loved teaching more kids the language and introducing them to the cultures where Spanish is spoken. At some point, I hope to do some posts on those adventures and share my teaching ideas.

This fall I decided to offer a new type of class... ¡Explora Español!, a six-week class that gives kids a taste of Spanish through culture and crafts. I have really enjoyed this class more than I would have imagined. With each week, I teach a bit of Spanish and then connect it to a cultural component which leads into a craft. Let's take a look at one of the classes I did to see how it all works together...

One week I taught the kids body parts. Since I tend to use Mr. Potato Head in my regular classes when teaching body parts I figured I would do the same in my exploratory class also. Then it hit me. Potatoes are originally from South America. There was a tie-in. So after teaching body parts, we talked about the potato and where it came from. I mentioned the many varieties out there...many more than my students had ever seen. We then reviewed the body parts using Mr. Potato Head. I then gave each student a potato and we got to work. This craft was done mostly in Spanish. We started with the "ojos" and did the complete face. The sombrero and zapatos were next. We finished by placing cut pipe cleaners on the sides for brazos. 


The paper parts I cut out ahead of time to save time. {Also, it is a good idea to wash and dry the potatoes ahead of time so the glue will stick.} You can find several templates online like here. Make sure to resize them so they will fit on the potatoes you are using.  We would review the name of the body part in Spanish and then students would put glue {We used this one, and it works well.} on the piece. Because the potatoes are round it helped to hold the pieces in place for a few seconds. I had the students count to twenty in Spanish before taking their fingers off one of the pieces. With the shoes, it was helpful to use these glue dots instead of the liquid glue. Aren't they so cute?

Here are some other ideas for connecting language, culture, and crafts into your lessons {You can click on the link for each craft to get ideas}:

Names of animals-- Talk about the importance of llamas in South America-- Paint a llama 
Clothing vocabulary-- Talk about Guatemala and worry dolls-- Make a worry doll


House Vocabulary-- Talk about the neighborhood of La Boca, Buenos Aires, Argentina-- Make "La Boca Houses"
Weather Vocabulary-- Talk about the Atacama Desert in Chile-- Make a Chilean rainstick
Fruit and Veggie vocabulary-- Talk about Chile and Peru and arpilleras-- Make an arpillera
Telling time-- Talk about the artist Salvador Dalí-- Make melting clocks

Do you have any other connections for teaching language, culture and then adding a craft? I would love to hear them!!

Tuesday, March 20, 2018

Easter Island {Cultural Craft for Spanish Students}


{Affiliate Links Used}

I am gearing up for another summer of Spanish camps and so looking forward to it. My camps are composed of language practice, cultural crafts, games, geography, and stories. It is a great introduction for kids in the language. You can find all my posts about summer camp if you click here.

Last year we made personal piñatas, molas, Chilean rainsticks, and a few other cultural crafts. For the kids that will be returning this year, I needed to have some new material to teach them and some new crafts. One of the days we will focus on body parts and the country of Chile so I thought it would be a great opportunity to make Moai, the famous Easter Island statues. 

I wanted an easy, quick way for students to make the statues without us taking too much time. I happened to find this ice cube mold and thought it would be perfect! (You can find it here.) Next I wanted a no-mess, easy clean-up clay that would air dry. This air dry clay is perfect, and I bought several packages in gray to make the heads with. To add to the educational value of the craft we are going to model the actual island (which is triangular) and  add a little bit of the ocean around it. I am thinking that I will make the clay for the island and the water to save on money. You can find a recipe here.


Along with making the islands, we will be spending sometime learning/reviewing body parts. I have made some extra statues in order to play a game that I saw online a few months back. Here's how it is done: You create two lines of students and have them face each other so that each kid has a partner. They need to be seated on the floor/ground. Place between each set of kids a Moai statue. Then begin to call out body parts in Spanish. Whatever body part is called the students have to place their hands on that part of themselves. So for example, if I say "cabeza" they will put their hands on their head. Call out several body parts. Then at some point say "Vayan" (or even "estatua") which means the pairs have to grab the little statue that is between them. Whoever grabs it first between the two kids wins and gets to stay in the game. Have the remaining that are still playing pair up with a new partner and do another round. Continue until you have only one student remaining. You can modify this game to make it a little less competitive for younger kids who sometimes struggle with winning and losing. Don't have anyone exit the game. Let everyone continue playing no matter who got the statue first.


I am also planning on doing a scavenger hunt with the statues by hiding them in an outdoor area and having the students search for them. I will probably do directions in the target language for older kids.

Here are some other resources to use in conjunction with this craft...

For my summer camps I limit the number of students so that kids get to practice in the language. So I will probably be buying several sets of these excavation kits for kids to work on in pairs. They get to dig up some Moai! (You can find them here.)

Also, have you been to Mundo de Pepita? It is an awesome blog with tons of resources and ideas for teaching Spanish to children. She also has a Teachers pay Teachers store which you can find HERE. She recently came out with a bulletin board set for the country of Chile! I will be using it during my camps as I like to have visual representations of the different countries we study. The set includes Moai, guanacos, the Chilean flag, some of the flora of the country, and a few other items.


Finally, here is a game to use, especially if you are breaking your students into groups to do center work. They can call out the numbers in Spanish as they play. The game is called Sneaky Statues and can be ordered HERE.

If you have any other ideas to go along with the Moai I would love to hear them!!

Monday, January 29, 2018

Teaching Young Kids Spanish Numbers 11-20


{Affiliate links used.}


When it comes to counting in Spanish, once kids have 1-20 memorized the numbers up to 100 become easier. Most kids in the US already know 1-10 in Spanish or at least most of those numbers. Eleven through twenty tend to be more challenging. Last week I did a simple activity with some of my young students to get them counting and help them memorize their numbers. The key ingredient? STICKERS!

There is something motivating about stickers for kids. While there isn't much prep to this activity it does require stickers in bulk. I also prefer to have different colored stickers so that we can practice the colors. Just a word of warning...we found that stickers shaped like stars or other intricate cutouts are harder for young hands. The rounder ones worked better. Here are some resources:

Colored Smiley Faces
Colorful Paw Print Stickers
Star Stickers (these are actually round stickers)
Multi-Colored Stickers
Multi-Colored Stickers II
Dinosaurs
Furry Friends

I cut sheets in half to hand out to students making sure I cut them so they have a variety of colors. Each students will need several (about four) half sheets. I also provide each student with a piece of paper with the numbers 11-20 written down the side (see above picture). I then call out a number and color (the color is optional) and the students have to find that number on their paper and put the correct number of stickers in a line by that number. They are required to count in Spanish while they do this.

So here are some tips for this activity:


  • Make sure you have already spent some time working with the numbers. Don't do this activity right after introducing 11-20.


  • The stickers are highly motivating. I tell my students that as I walk around and listen if I can hear them counting in Spanish they will get extra stickers at the end to take home.


  • Be prepared for some students to lose track as they count and get a little frustrated. Some students can count and not lose track; others struggle because they are hearing their classmates around them counting and then they lose track. To deal with this it is best to separate students so they aren't so close together. I also help those that lose track by counting with them from time to time. It can be a struggle, but in the end they learn the numbers really well.


  • I don't do all the numbers 11-20 with stickers. The activity would be way too long for young kids. So I do about seven of the numbers and the rest are left blank or they can do them at home. I make sure I call out the number 20 so that they get practice going through all the teen numbers.


  • Walk around and listen to them count! Help if they get stuck. Recount with them if need be. 


Soon they will be counting to twenty with ease!